Uncategorized
How To Clean The Carburettor of a Royal Enfield Bullet 350cc
A carburettor (also spelt as carburetor, and will be referred to as carb. from now on, not to be confused with carbohydrates) is a device which mixes the fuel and air, before the mixture enters the engine. It is the carb that changes the amount of fuel entering the engine and in turn manipulates the power that you get. Often when you get fuel from an unreliable pump, there are chances that impurities enter your fuel tank, which would eventually end up in your carb. The first time I opened my carb, I did look for instructions for opening it on the internet, but didn’t find any. So now that I am experienced enough to open n reassemble my carb, I thought why not put up a post for the newbies. Before working on machine parts, I think it is important for you to remember the following things :
 Make the carb accessible by removing all pipes and cable that are obstructing your work space, like the pipe (1) from the airbox. Unscrew the nut (2) holding the carb with the input manifold. Also, loosen the screw (3) holding the hose coming from the air filter. Pardon me for the filthy carb, but cleaning it is a tedious job, and as far as the insides are clean n all the orifices are open it really doesn’t make any difference. Also, I started of by taking decent pics, but eventually, as my hands got dirty, the quality of the pictures started decreasing too.
 Now coming to the other side, unscrew the nut (4) barely visible, after you have pulled out the fuel pipe (5) coming in from the tank.
 Remember to close the fuel supply coming from the tank before you pull out the fuel pipe. Also, remember that when you pull out the pipe, a little fuel (6), that is there in the pipe is going to get spilled. So put out that cigarette before you start removing your carb.
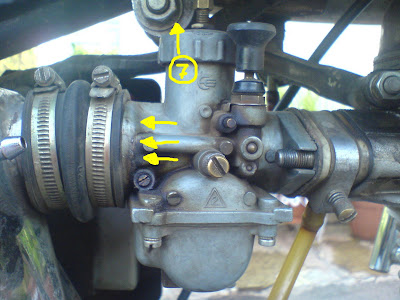 Pull the carb back in the direction shown. In some of the older models, the nut (7) holding the tank in place might restrict the movement of the carb. If you are unable to remove the carb, you might have to open up the nut.
 Now all that holds the carb is the accelerator cable (8) to remove which you’d have to unscrew the top part (9).
 As you unscrew the top part, you will notice a spring (10) pop out.
 Take out this cylindrical thing (11) (the name of which I just can’t remember) which manipulates the amount of air in the mixture, carefully.
 Be careful while you pull out the cylinder so as you don’t bend the needle (12) that controls the amount of fuel that goes in. Clean the cylindrical part of any deposits (13)


Now that the carb is off, look on the underside, and you will notice four nuts holding the bottom part of the carb in place. This bottom part contains fuel, so hold the carb upright at all times. Unscrew the four screws (two of which are shown in the picture (14), (15))
 The bottom part in now out. Notice that a part of the packaging (16) from my carb is missing. It happened because I wasn’t careful while I was putting it back, a long time ago. This bottom half is basically your carb’s reservoir. This is why your engine runs for a while, even after you have cut off the fuel. Notice the muck (17) that has accumulated at the bottom. This is what blocks the jets (will explain what it is later) of the carb.
 Now it’s time to remove the your float (19). A float is a device used to cut off the fuel when the reservoir gets full. If your carb leaks fuel when the engine is off and the fuel supply is on, it is because this system is malfunctioning.
 Carefully put the pin n float aside.
 Once you remove the float, a tiny projection (20) would be now visible. This is your float pin, the part that actually plugs the hole from which fuel flows into the reservoir.
 Carefully slide out the float pin (21) and clean it.
 This it what a float-pin looks like. Clean it and make sure it isn’t rusting. If in case it is, don’t forget to clean the rust too. It needs to be as smooth as possible to slide up and down to allow or stop the flow the flow of fuel.
 Okay now it’s time for the jets. There are usually two jets in a carb. One is the Idling jet (23) which basically is the orifice through which the minimum amount of fuel that goes into an engine at all times, flows. While the pilot jet (22) is the orifice for the fuel when you make use of the throttle. I am only going to unscrew the pilot jet for now, but if you want you could open your idling jet too, which resides in side the small pipe.
 This is what the pilot jet looks like when it comes out. Clean the tiny hole that you see in the middle with a pin. This is the thing that you need to change, to get more power out of your bike. When you put a bigger jet, you simply allow more fuel to flow into your engine. This process is called up-jetting. Although it has an effect on the mileage the bike give, it is one of the cheapest ways of getting more performance.
 The float which we had removed earlier also requires cleaning. I make use of paper (not sandpaper) to clean the float. Paper is abrasive enough to clean the float, but not enough to damage it. Notice the difference in a two sides, one (24) cleaned with paper, the other (25) with a piece of cloth.
 If the outside of your carb is as filthy as mine, and want to clean it, you could use kerosene and a toothbrush to do so. Although the extra fuel in the reservoir can also be used to do so, experience tells me that brushes do not survive for long (read over a minute) wen exposed to petrol.

 Assemble everything back together.
 When you look in from the top, you’ll notice a small (possibly sharp) projection (26) which is not quite visible in this image.
 That projection in the last picture was to guide this cylindrical thing up and down the shaft. Make sure the grove (27) coincides with the projection. Don’t force it in. Look I forgot to clean this thing up. Also make sure that the rubber packaging (28) fits in properly. Remember, never to force this part in. Also take care of the needle.


 Fit back top part which is connected to the accelerator cable. And check if the carb is working when the throttle is given. Notice the 3 positions of the throttle I have photographed the carb in. Full throttle, not restricting the airflow at all, half-throttle and the airflow is partially restricted, no throttle n there is very little space for the air. BTW it was very difficult for me to take this picture with the carb in one hand, camera in the other n me precariously holding the throttle against my leg.
 Fit the carb in the hose from the air filter (29)
 Pull it back n fit it in the two bolts meant to hold it in place.
 Fit back the nut (30) and put back the fuel pipe (31)
 Tighten the nut (32), and the screw (33) and put back the pipe to the air box. Start her up, n the engine should sound smoother than before.
- Always open a nut/screw with the appropriate tool. The spanner/ratchet should be of the exact fit on the nut. Also the screw-driver should fit in the groove right.
- Take care of the nuts and washer that you open. Don’t lose or mix em up. If possible make use of a tray to store all your nuts.
- While tightening nuts/screws, make sure that the first few turns should be made by hand and not with a tool. Use a tool to force a nut and you will surely ruin the threads.
- While tightening nuts/screws make sure you don’t leave any loose, or the vibration wold make them fall off. Tighten em too much and you could ruin the thread.
- Certain tools require lesser force than others to operate, like a rubber gripped screwdriver is simpler to use than a regular one, or a ratchet requires lesser force to operate than a spanner. Make sure you do not apply too much force while using these tools.
Now where were we? Yeah, the carb. Ok, I am using a carb. called VM24 from Mikcarb, which is a standard carb for any 350cc cast iron Royal Enfield.
 Make the carb accessible by removing all pipes and cable that are obstructing your work space, like the pipe (1) from the airbox. Unscrew the nut (2) holding the carb with the input manifold. Also, loosen the screw (3) holding the hose coming from the air filter. Pardon me for the filthy carb, but cleaning it is a tedious job, and as far as the insides are clean n all the orifices are open it really doesn’t make any difference. Also, I started of by taking decent pics, but eventually, as my hands got dirty, the quality of the pictures started decreasing too.
 Now coming to the other side, unscrew the nut (4) barely visible, after you have pulled out the fuel pipe (5) coming in from the tank.
 Remember to close the fuel supply coming from the tank before you pull out the fuel pipe. Also, remember that when you pull out the pipe, a little fuel (6), that is there in the pipe is going to get spilled. So put out that cigarette before you start removing your carb.
 Pull the carb back in the direction shown. In some of the older models, the nut (7) holding the tank in place might restrict the movement of the carb. If you are unable to remove the carb, you might have to open up the nut.
 Now all that holds the carb is the accelerator cable (8) to remove which you’d have to unscrew the top part (9).
 As you unscrew the top part, you will notice a spring (10) pop out.
 Take out this cylindrical thing (11) (the name of which I just can’t remember) which manipulates the amount of air in the mixture, carefully.
 Be careful while you pull out the cylinder so as you don’t bend the needle (12) that controls the amount of fuel that goes in. Clean the cylindrical part of any deposits (13)


Now that the carb is off, look on the underside, and you will notice four nuts holding the bottom part of the carb in place. This bottom part contains fuel, so hold the carb upright at all times. Unscrew the four screws (two of which are shown in the picture (14), (15))
 The bottom part in now out. Notice that a part of the packaging (16) from my carb is missing. It happened because I wasn’t careful while I was putting it back, a long time ago. This bottom half is basically your carb’s reservoir. This is why your engine runs for a while, even after you have cut off the fuel. Notice the muck (17) that has accumulated at the bottom. This is what blocks the jets (will explain what it is later) of the carb.
 Now it’s time to remove the your float (19). A float is a device used to cut off the fuel when the reservoir gets full. If your carb leaks fuel when the engine is off and the fuel supply is on, it is because this system is malfunctioning.
 Carefully put the pin n float aside.
 Once you remove the float, a tiny projection (20) would be now visible. This is your float pin, the part that actually plugs the hole from which fuel flows into the reservoir.
 Carefully slide out the float pin (21) and clean it.
 This it what a float-pin looks like. Clean it and make sure it isn’t rusting. If in case it is, don’t forget to clean the rust too. It needs to be as smooth as possible to slide up and down to allow or stop the flow the flow of fuel.
 Okay now it’s time for the jets. There are usually two jets in a carb. One is the Idling jet (23) which basically is the orifice through which the minimum amount of fuel that goes into an engine at all times, flows. While the pilot jet (22) is the orifice for the fuel when you make use of the throttle. I am only going to unscrew the pilot jet for now, but if you want you could open your idling jet too, which resides in side the small pipe.
 This is what the pilot jet looks like when it comes out. Clean the tiny hole that you see in the middle with a pin. This is the thing that you need to change, to get more power out of your bike. When you put a bigger jet, you simply allow more fuel to flow into your engine. This process is called up-jetting. Although it has an effect on the mileage the bike give, it is one of the cheapest ways of getting more performance.
 The float which we had removed earlier also requires cleaning. I make use of paper (not sandpaper) to clean the float. Paper is abrasive enough to clean the float, but not enough to damage it. Notice the difference in a two sides, one (24) cleaned with paper, the other (25) with a piece of cloth.
 If the outside of your carb is as filthy as mine, and want to clean it, you could use kerosene and a toothbrush to do so. Although the extra fuel in the reservoir can also be used to do so, experience tells me that brushes do not survive for long (read over a minute) wen exposed to petrol.
 Assemble everything back together.
 When you look in from the top, you’ll notice a small (possibly sharp) projection (26) which is not quite visible in this image.
 That projection in the last picture was to guide this cylindrical thing up and down the shaft. Make sure the grove (27) coincides with the projection. Don’t force it in. Look I forgot to clean this thing up. Also make sure that the rubber packaging (28) fits in properly. Remember, never to force this part in. Also take care of the needle.

 Fit back top part which is connected to the accelerator cable. And check if the carb is working when the throttle is given. Notice the 3 positions of the throttle I have photographed the carb in. Full throttle, not restricting the airflow at all, half-throttle and the airflow is partially restricted, no throttle n there is very little space for the air. BTW it was very difficult for me to take this picture with the carb in one hand, camera in the other n me precariously holding the throttle against my leg.
 Fit the carb in the hose from the air filter (29)
 Pull it back n fit it in the two bolts meant to hold it in place.
 Fit back the nut (30) and put back the fuel pipe (31)
 Tighten the nut (32), and the screw (33) and put back the pipe to the air box. Start her up, n the engine should sound smoother than before.
Thanks for the valuable info.. very well explained!
plsr…
good on mate …
Nic info, Any Blog on cleaning UCE 350CC carburettor
superb piece of info.this really helped me n many like me out there. could you pls do another post on adjusting carb & rejetting for higher altitudes (himalayas 18000 ft) and the logic behind it. it seems to be some secret that no one wants to talk about.
thanks in advance.
Man where can i get info about the most important component of the RE engine .. THE OIL .. the make/type/amount of oil to be used according to the climatic conditions
tanuj
there is no need to worry abt the oil in any climate condition…
The oil used in RE is 20/50W in engine and 10/30W in Clutch(If CI Engine)……
If any problem persists due to climate conditions then u may need to adjust the petrol mixture in carburetor….!
Thats it…..
As you stated the gasket in display 16 is broken. Did you leave that way, and if you did is it fine?
@corey: ofcourse it was changed prior before fitting….!
I have an old Bullet 350 1990 model, which oil should I be using?
is it same as “The oil used in RE is 20/50W in engine and 10/30W in Clutch” or different for older models.
Also, please tell me what else I should be concerned about in an old Bullet.